How to create multiple links on Single image

Requirement : Multiple labels on a image, on click of each image user should be redirected to respective link.

Reference link – https://www.netplanter.com/how-to-create-multiple-links-in-single-image-with-css/

<img src="sites/qms/Images1/QMSLandingPage.png?csf=1&web=1&e=WEKuhK"
alt="Multiple links image" 
usemap="#multilinks" width="1000"
height="861">
<map name="multilinks"> 
<area id="a1" shape="rect" 
coords="385,90,735,140"
alt="ConsultingServices"
href="sites/qms/SitePages/ConsultingServices.aspx">
<area  id="a2"  shape="rect"
coords="440,315,860,360"
alt="TransformationServices"
href="/sites/qms/SitePages/TransformationServices.aspx">
<area  id="a3" shape="rect"
coords="375,540,689,590"
alt="ManagedServices"
href="/sites/qms/SitePages/ManagedServices.aspx">
<area  id="a4" shape="circle"
coords="139,330,135"
alt="ProjectManagement"
href="/sites/qms/SitePages/Project-Management.aspx">
</map>

<style>
   #a1:hover:after {
position:absolute;
     display:block;
     content: ' ';
     border: 2px solid red;
     top: 200px;
     left: 605px;
     width: 350px;
     height: 50px;
   }
 #a2:hover:after {
     position:absolute;
     display:block;
     content: ' ';
     border: 2px solid red;
     top: 420px;
     left: 660px;
     width: 420px;
     height: 50px;
   }
#a3:hover:after {
     position:absolute;
     display:block;
     content: ' ';
     border: 2px solid red;
     top: 640px;
     left: 600px;
     width: 315px;
     height: 50px;
   }
</style>

Thank you.
Power Automate – File Attachment in Approval action and in email action

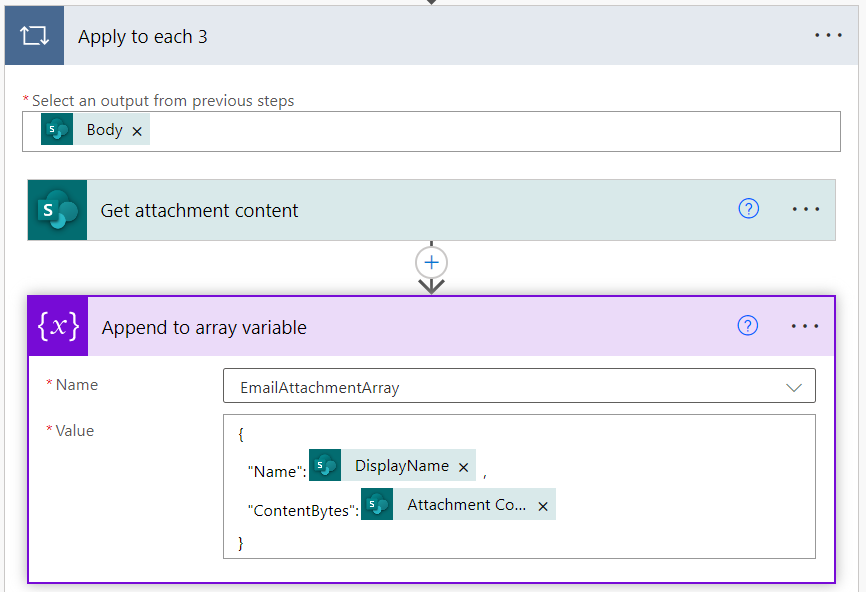
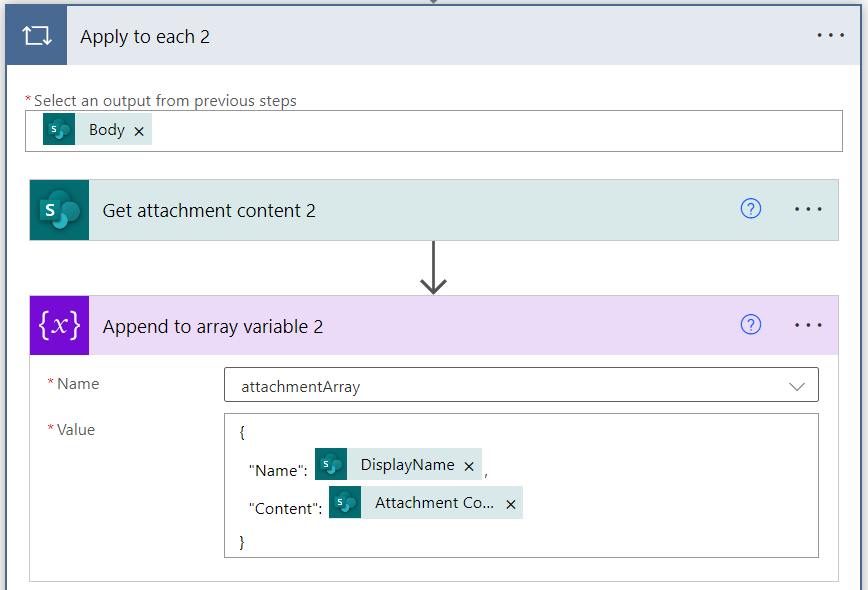
The problem is that the content key for the array when used with email is different than the key used for approvals.  For approvals the key is “content”: but for email the key is “ContentBytes”: 

You’ll need to use two different arrays if you want to do both approvals and email attachments. Only step which varies is append to array variable. Below gives the workflow basic syntax and the step where the key value changes. You need to initialize two different arrays, one for approval and one for email.

For Approval Workflow looks like below –

Append array looks like below –

And for email workflow looks like below –

Append array looks like below –

Thank you.

Power Apps : Filter expression with multiple conditions to filter gallery items.

Below code filters gallery items based on value selected in drop downs and matching the current logged in user.

Filter('Customer Appreciation', (StartsWith(Title,Dropdown1.SelectedText.Value)|| Dropdown1.SelectedText.Value=Blank()) && ('Appreciation Month'=Dropdown2.SelectedText.Value || Dropdown2.SelectedText.Value = Blank()) && (StartsWith('Created By'.Email,User().Email)))

Power Apps : Add Blank value to Drop Down

To add blank value on top of the drop down values which are fetched from some data source as shown below.

Write below line of code under “Items” property of the drop down.

Ungroup(
    Table(
        {DDMenuOptions: Table({DDValue: Blank()})},
        {DDMenuOptions: Filter('Customer Appreciation',"Title")}
    ),
    "DDMenuOptions"
)

Thank you.

SharePoint Error: “Access denied. You do not have permission to perform this action or access this resource” Error while uploading a file or creating a folder in Style Library

I am the global admin, Site owner. I had all the elevated access on the site but still got access denied error while uploading folder with files to Style library. I rechecked my access, every thing was just fine.
Then I had to search for the similar issues and below blog helped me to resolve this –

Happy learning!!

Microsoft Flow – Get members of a group and assign permissions

Requirement : While uploading the document, user would mention which group should have access on the document by selecting the category. We need to grant them access on the document after the approval process is complete. Now we had to decide which type of group to create.

  • Office 365 groups
  • Security Groups
  • SharePoint Groups

Below article explains what is the difference between a security group and Office 365 group.

office 365 groups vs azure ad groups.

Azure AD Group

I started with Security group, Created a security group and tried to get the members in the flow to grant access.

4

Issue – Second option in the above image, gets the members of a AD group, but it was not getting external user names, it was retrieving only internal users.

Office 365 Groups

Then I tried with office 365 groups, but I could not resolve below issue. Issue looked simple, got all possible privileges but still I kept getting the same error. Now also I am not sure why I was getting this error.

5

SharePoint Groups – 

Last option left was SharePoint group and for SharePoint group we have direct option to grant access to groups without getting the group members.

6

Issue – It was giving blank email ID for an external user. There was no property which can be mapped to email ID of an external user in the user profile, because of which it was showing blank.

7

We wanted to use Security group or a office 365 group but We went with SharePoint groups and asked IT team to update the user profiles with email ID for external users.

Please provide your inputs about office 365 groups if anybody worked on them in Microsoft flow.

Thank you.

Microsoft flow – Approval workflow

When we run the approval workflow with action ‘Start an approval”or “Start and wait for an approval”, Approval status does not get updated after the approval process is complete. We need to update it explicitly through further workflow steps.

Below steps will show how to set the Approval status based on the approval action.

2

Check the Outcome value, If it approve, set the approval status to Approved if not set it to Rejected

3


It will set the Approval status.

Cheers.

SharePoint Library – Hide or Show field on the edit form based on the value selected.

Requirement –  There was a Category and Sub-Category. Not all categories had Sub-Categories. So requirement was to hide or show the sub category based on the value selected in category field.

Below is the code I got from one of the article.


// wait for the window to load
$(document).ready(function () {
// Get a single select dropdown field
var CategoryField = SPUtility.GetSPField('Category');

// create a function to show or hide Sub-Category based on Category's value
var showOrHideField = function() {
var CategoryFieldValue = CategoryField.GetValue();
// Hide the City field if the selected value is Other
if(CategoryFieldValue === 'Information Systems') {
SPUtility.ShowSPField('Sub-Category');
}
else {
SPUtility.HideSPField('Sub-Category');
}
};

// run at startup (for edit form)
showOrHideField();

// make sure if the user changes the value we handle it
$(CategoryField.Dropdown).on('change', showOrHideField);
});


You need to place this code in the content editor web part of a edit form.

This can be implemented in the Classic sites.


Hope this is helpful to few people.

Shree.


Key Filters on SharePoint List/Library

Requirement – Filters for the library/list as shown below.

4

This can be achieved through OOTB feature called “Key Filters“. This is a very old feature but I came to know today.

Key Filter is a mechanism to filter a very large list or library. We can filter based on the Metadata property or term associated with it.

Steps

Step 1 – Go to List/Library settings -> Metadata navigation settings.

2

Step 2 – Note: If “Metadata navigation settings” is missing, activate below feature.

1

Step 3 – Add key filter fields as shown below and click OK.3

Step 4 – This web part will appear as shown below.

4

I don’t know why I dint come across this for so long. Loved it.

Enjoy…