Below article was very helpfull. Thank you.
Solution with Explaination : https://blogs.msdn.microsoft.com/briangre/2014/12/30/401-unauthorized-response-to-register-spworkflowservice/
-Shree
Below article was very helpfull. Thank you.
Solution with Explaination : https://blogs.msdn.microsoft.com/briangre/2014/12/30/401-unauthorized-response-to-register-spworkflowservice/
-Shree
We get above error even when we are using IE. IE 11 is not compatible with Infopath forms on premises. We cannot open the customize the form using IE 11, To fix this we need to follow below steps.

– Shree
Requirement – Requirement was to add attachments in the task process email ID. This was easy in Nintex 2013 as we just had to check the check box to include the attachments but this feature is not enabled in Nintex office 365. Since we dont have direct option to include attachments, we thought of including attachments links on the email body.
Below are the steps to include the attachments in the start task process email body.

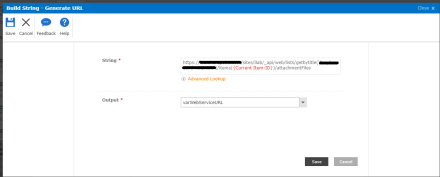


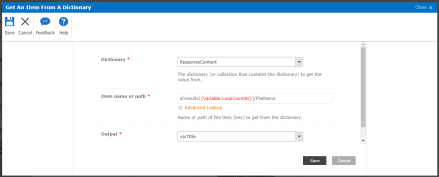


Workflow looks like below. We get the attachment text using above steps and we need to place that in the “Start task process” email body.
Hope this is helpful.
-Shree
Error – “Sorry, something went wrong, request time out. ”
Follow below steps –
Try doing the Reset Index again and it should work.
Cheers….
Error – Search has encountered a problem that prevents results from being returned. If the issue persists, please contact your administrator.

After searching in the internet, found this article helpful –
“http://moresharepoints.blogspot.in/2015/07/search-has-encountered-problem-that.html”
Ran below commands to check if the search index partition is degraded on the search.
$searchApp= Get-SPEnterpriseSearchServiceApplication
Get-SPEnterpriseSearchStatus –SearchApplication $searchApp[0].Name

And found that Search index partition is degraded.
Then reset the index on the central admin

After Index reset and the full crawl, search started working perfectly.
Thank you Purna for saving my day…
Below script helps to upload pictures to AD
[Code type=”PowerShell”]
function Upload-PhotosToSP
{
if ( (Get-PSSnapin -Name Microsoft.SharePoint.PowerShell -ErrorAction SilentlyContinue) -eq $null )
{
Write-Host “Loading SharePoint assemblies…”
Add-PsSnapin Microsoft.SharePoint.PowerShell
}
#Get site, web and profile manager objects
$LocalPath = “C:\Scripts\UPLOAD-ProfilePhotos\picture library test\”
$MySiteUrl = “http://mySite.com:82/”
$mySiteHostSite = Get-SPSite $MySiteUrl
$mySiteHostWeb = $mySiteHostSite.OpenWeb()
$context = Get-SPServiceContext $mySiteHostSite
$profileManager = New-Object Microsoft.Office.Server.UserProfiles.UserProfileManager($context)
try
{
#Get files from local folder
$localPhotosFolder = Get-ChildItem $LocalPath
#Get User Photos document library in the My Site host site
$spPhotosFolder = $mySiteHostWeb.GetFolder(“User Photos”)
#Upload each image file and configure user profiles
$localPhotosFolder | ForEach-Object {
#Generate file path for upload into SharePoint
$spFullPath = $spPhotosFolder.Url + “/” + $_.Name
#$Overwrite= true
$FilePath = $LocalPath + $_.Name
#Check if the file exists and the overwrite option is selected before adding the file
#if ((!$mySiteHostWeb.GetFile($spFullPath).Exists) -or ($Overwrite)) {
#Add file to the User Photos library
write-host “Copying” $_.Name “to” $spFullPath.Replace(“/” + $_.Name,””) “in” $mySiteHostWeb.Title “…” -foregroundcolor Green
$spFile = $spPhotosFolder.Files.Add($spFullPath, $_.OpenRead(), $true)
$spImagePath = $mySiteHostWeb.Url + “/” + $spFile.Url
#Get the domain and user name from the image file name
$domainName = $_.Name.Split(“_”)[0]
$userName = $_.Name.Split(“_”)[1].Replace($_.Extension, “”)
$adAccount = $domainName + “\” + $userName
#Check to see if user profile exists
if ($profileManager.UserExists($adAccount))
{
#Set picture in AD also
$image = [Byte[]](Get-Content $FilePath -Encoding byte)
Set-ADUser -Identity $userName -replace @{thumbnailPhoto=$image}
Set-ADUser -Identity $username -replace @{jpegPhoto=$image}
write-host “Uploading” $_.Name “picture to AD ” -foregroundcolor Green
#Get user profile and change the Picture URL value
$up = $profileManager.GetUserProfile($adAccount)
$up[“PictureURL”].Value = $spImagePath
$up.Commit()
}
else
{
write-host “Profile for user”$adAccount “cannot be found”
}
#}
#else
#{
# write-host “`nFile”$_.Name “already exists in” $spFullPath.Replace(“/” + $_.Name,””) “and shall not be uploaded” -foregroundcolor Red
#}
}
#Run the Update-SPProfilePhotoStore cmdlet to create image thumbnails and update user profiles
write-host “Waiting to update profile photo store – Please wait…”
Start-Sleep -s 60
Update-SPProfilePhotoStore –MySiteHostLocation $MySiteUrl
write-host “Profile photo store update run – please check thumbnails are present in Profile Pictures folder.”
}
catch
{
write-host “The script has stopped because there has been an error: “$_
}
finally
{
#Dispose of site and web objects
$mySiteHostWeb.Dispose()
$mySiteHostSite.Dispose()
}
}
Upload-PhotosToSP
Below script helps to download the files from SharePoint library.
[Code type=”PowerShell”]
Remove-PSSnapin Microsoft.SharePoint.PowerShell -erroraction SilentlyContinue
Add-PSSnapin Microsoft.SharePoint.PowerShell -erroraction SilentlyContinue
######################## Variables #####################
$destination = “C:\Scripts\UPLOAD-ProfilePhotos\”
$webUrl = “http://mySite/IntranetServices/”
$listUrl = “http://mySite/IntranetServices/pictures/”
#####################################################
$web = Get-SPWeb -Identity $webUrl
$list = $web.GetList($listUrl)
function parseUser([string] $m ){
# function takes a lastname, firstname MI string and parses to match manager info. returns email address.
if ($m -ieq “”)
{
return $null
}
else
{
$split = $m.split(” “)
$fn = $split[0]
$ln = $split[1]
#$splitfn = $fnmi.split(” “)
#$fn = $splitfn[1]
$fi = $fn.substring(0,1)
$em = $fi + $ln #+ “@healthgrades.com”
#$validatedManager = checkManager($em)
return $em
}
}
function DownLoadImages($folderUrl)
{
$folder = $web.GetFolder($folderUrl)
foreach ($file in $folder.Files)
{
$UserID = parseUser($file.Name)
$UserID = “_” + $UserID
#Ensure destination directory
$destinationfolder = $destination + “/” + $folder.Url
if (!(Test-Path -path $destinationfolder))
{
$dest = New-Item $destinationfolder -type directory
}
#Downloading file
$binary = $file.OpenBinary()
$stream = New-Object System.IO.FileStream($destinationfolder + “/” + $UserID), Create
$writer = New-Object System.IO.BinaryWriter($stream)
$writer.write($binary)
$writer.Close()
}
}
try
{
#Download root files
DownLoadImages($list.RootFolder.Url)
#Download files in folders
foreach ($folder in $list.Folders) {
DownLoadImages($folder.Url)
}
}
catch
{
write-host $_.exception
}
finally
{
if($web -ne $null)
{
$web.Dispose()
}
}
[/code]
Cheers…
Error while running the command “Register-SPWorkflowService” in SharePoint 2013
I was not getting SharePoint 2013 workflow template type in SharePoint Designer 2013, so configured workflow manager and was trying to register SPWorkflowService by running below command but received below error .
Command – Register-SPWorkflowService –SPSite “http://server/sites/” –WorkflowHostUri “https://server:12290/”

did multiple trial and errors but nothing worked, then got the solution in below blog.
Steps –
There are 2 things to check.
1. Use FQD. Hence instead of using machine name for WorkflowHostUri, use full domain name, like https://wfserver.domain.com:12290/
2. Make sure the SharePoint Server trusts the certificate of Workflow site. For that do the following
Register-SPWorkflowService -SPSite “http://server/site ” -WorkflowHostUri “http://server:12290/” -AllowOAuthHttp -Force -ScopeName “SharePoint”
Enjoy exploring…
Error – In SharePoint 2013 on premises, I was trying to publish the workflow and received below error
“System.InvalidOperationException: Operation failed with error Microsoft.Workflow.Client.ScopeNotFoundException: Scope ‘/SharePoint/default’ was not found. HTTP headers received from the server – ActivityId: 0f2a45dd-abc8-4c5b-bd44-229f27e1090a. NodeId: server1. Scope: /SharePoint/default/c02de6f4-c3ce-405b-8d51-3be3fbf0755a. Client ActivityId : 7c53c79d-f6f8-a073-cc84-45a75a835626. —> System.Net.WebException: The remote server returned an error: (404) Not Found. at Microsoft.Workflow.C”
Solution: Register the workflow by setting the scope as shown below and it worked like a charm 🙂

Steps – Open SharePoint 2013 Management shell and run below command to register the workflow by setting the scope.
Register-SPWorkflowService -SPSite “http://server/site ” -WorkflowHostUri “http://server:12291/” -AllowOAuthHttp -Force -ScopeName “SharePoint”
Thank you so much to Karthick https://social.msdn.microsoft.com/Forums/sharepoint/en-US/fe913695-fb3e-4b5a-a229-f5bcd80fbbc9/sharepoint-2013-workflow-error?forum=sharepointcustomization
Enjoy learning…
Solution:
Activate the below feature to resolve the issue-
Then publish the form to a new form library and delete the old library.
Enjoy Learning…
